Deploy on the web#
First of all, note that we are sad that you won’t consider deploying your app on the SEPAL platform, but as the pysepal framework is platform agnostic, we’ll also demonstrate how to create and deploy an app on the web using Heroku.
This tutorial has been inspired by This pythonforundergradengineers article.
Note
This methodology has been used to deploy the demo app of the framework. the source code can be found here.
Warning
Heroku is a cloud hosting platform where deploying an app on a public account is free. If you prefer to use your favorite service, you’ll need to adapt this tutorial. You can still reach the development team in the issue tracker if you are experiencing difficulties.
The web platform offered by Heroku has very limited computation power. Please consider deploying on SEPAL if you require powerful computation resources.
Danger
As of now, the applications based on Google Earth Engine cannot work outside of SEPAL as it’s impossible to register to their services. An issue has been opened, have a look if you require this feature.
Set up the app#
Create#
To start this tutorial let’s create an application that doesn’t require GEE and runs only with Python tools. For the example, we’ll use the default template that only includes a GADM based Aoi selector. The full process is described in the Create my first module section.
module_factory
Using as parameters:
A module name
An empty github url
Any description
Template function:
noNeed aoi selector:
yesNeed GEE:
no
##################################
#                                #
#      SEPAL MODULE FACTORY      #
#                                #
##################################

Welcome to the module factory interface.
This interface will help you build a dashboard app based on the pysepal library
Please read the documentation of the library before launching this script


Initializing module creation by setting up your module parameters
‾‾‾‾‾‾‾‾‾‾‾‾‾‾‾‾‾‾‾‾‾‾‾‾‾‾‾‾‾‾‾‾‾‾‾‾‾‾‾‾‾‾‾‾‾‾‾‾‾‾‾‾‾‾‾‾‾‾‾‾‾‾‾‾‾

Provide a module name:
test_sepal
Provide the URL of an empty github repository:
git@github.com:12rambau/test_sepal.git
Provide a short description for your module(optional):

Do you need to use the default function as a template [y]?
no
Do you need an AOI selector in your module (it will still be possible to add one afterward) [y]?
yes
Do you need a connection to GEE in your module (it will still be possible to add one afterward) [y]?
no

Build the module init configuration
‾‾‾‾‾‾‾‾‾‾‾‾‾‾‾‾‾‾‾‾‾‾‾‾‾‾‾‾‾‾‾‾‾‾‾

[...]
Register libs#
To be working the app needs to have an up-to-date requirements.txt file. To create and populate it, run the following command from within the app folder.
$ cd test_sepal
~/test_sepal$ testmodule_deploy
You will get the following file:
# these libs are requested to build common python libs
# if you are an advanced user and are sure to not use them you can comment the following lines
wheel
Cython
pybind11
pre-commit

# if you require GDAL and or pyproj in your module please uncomment these lines
# there are set up to be inlined with SEPAL implementation of GDAL and PROJ version
GDAL==3.0.4
pyproj<3.0.0

# the base lib to run any pysepal based app
# don't forget to fix it to a specific version when you're app is ready
pysepal==2.4.0


# custom libs
Deploy on heroku#
Note
This deployment can be done using the Heroku CLI but it’s not installed on SEPAL so we will show how to do it using the web interface.
Now that we have a working and tested application let’s begin its transformation into a working web app. Your application repository needs adjustments to be compatible with the Heroku deploying environment.
Change requirements#
The requirements.txt file created with the model_deploy command is fully compatible with the current SEPAL environment, however, it needs some adjustment to be compatible with Heroku’s. Remove all lines referring to GDAL and PROJ installation, as they will be handled from the web interface. The final file should look like the following:
# these libs are requested to build common python libs
# if you are an advance user and are sure to not use them you can comment the following lines
wheel
Cython
pybind11
pre-commit

# the base lib to run any pysepal based app
# don't forget to fix it to a specific version when you're app is ready
pysepal==2.4.0


# custom libs
Create runtime#
At the root of your repository create a runtime.txt file containing the python version you want to use. Inside the file, just one line of text is needed. Note the lowercase python and the dash -. The list of Heroku’s supported versions can be found here.
In this case, we’ll use 3.8.12:
python-3.8.12
Create Procfile#
The last required file for our Heroku deployment is a Procfile. This file includes the instructions for Heroku to deploy our app. Create a new file named Procfile (no extension) and include the text below:
web: voila --port=$PORT --no-browser ui.ipynb
Tip
You can change the name of the root file if the entry point of your app is not the default ui.ipynb
Set the deployment env#
Warning
All the previously created files need to be up-to-date on GitHub before going on the Heroku web interface.
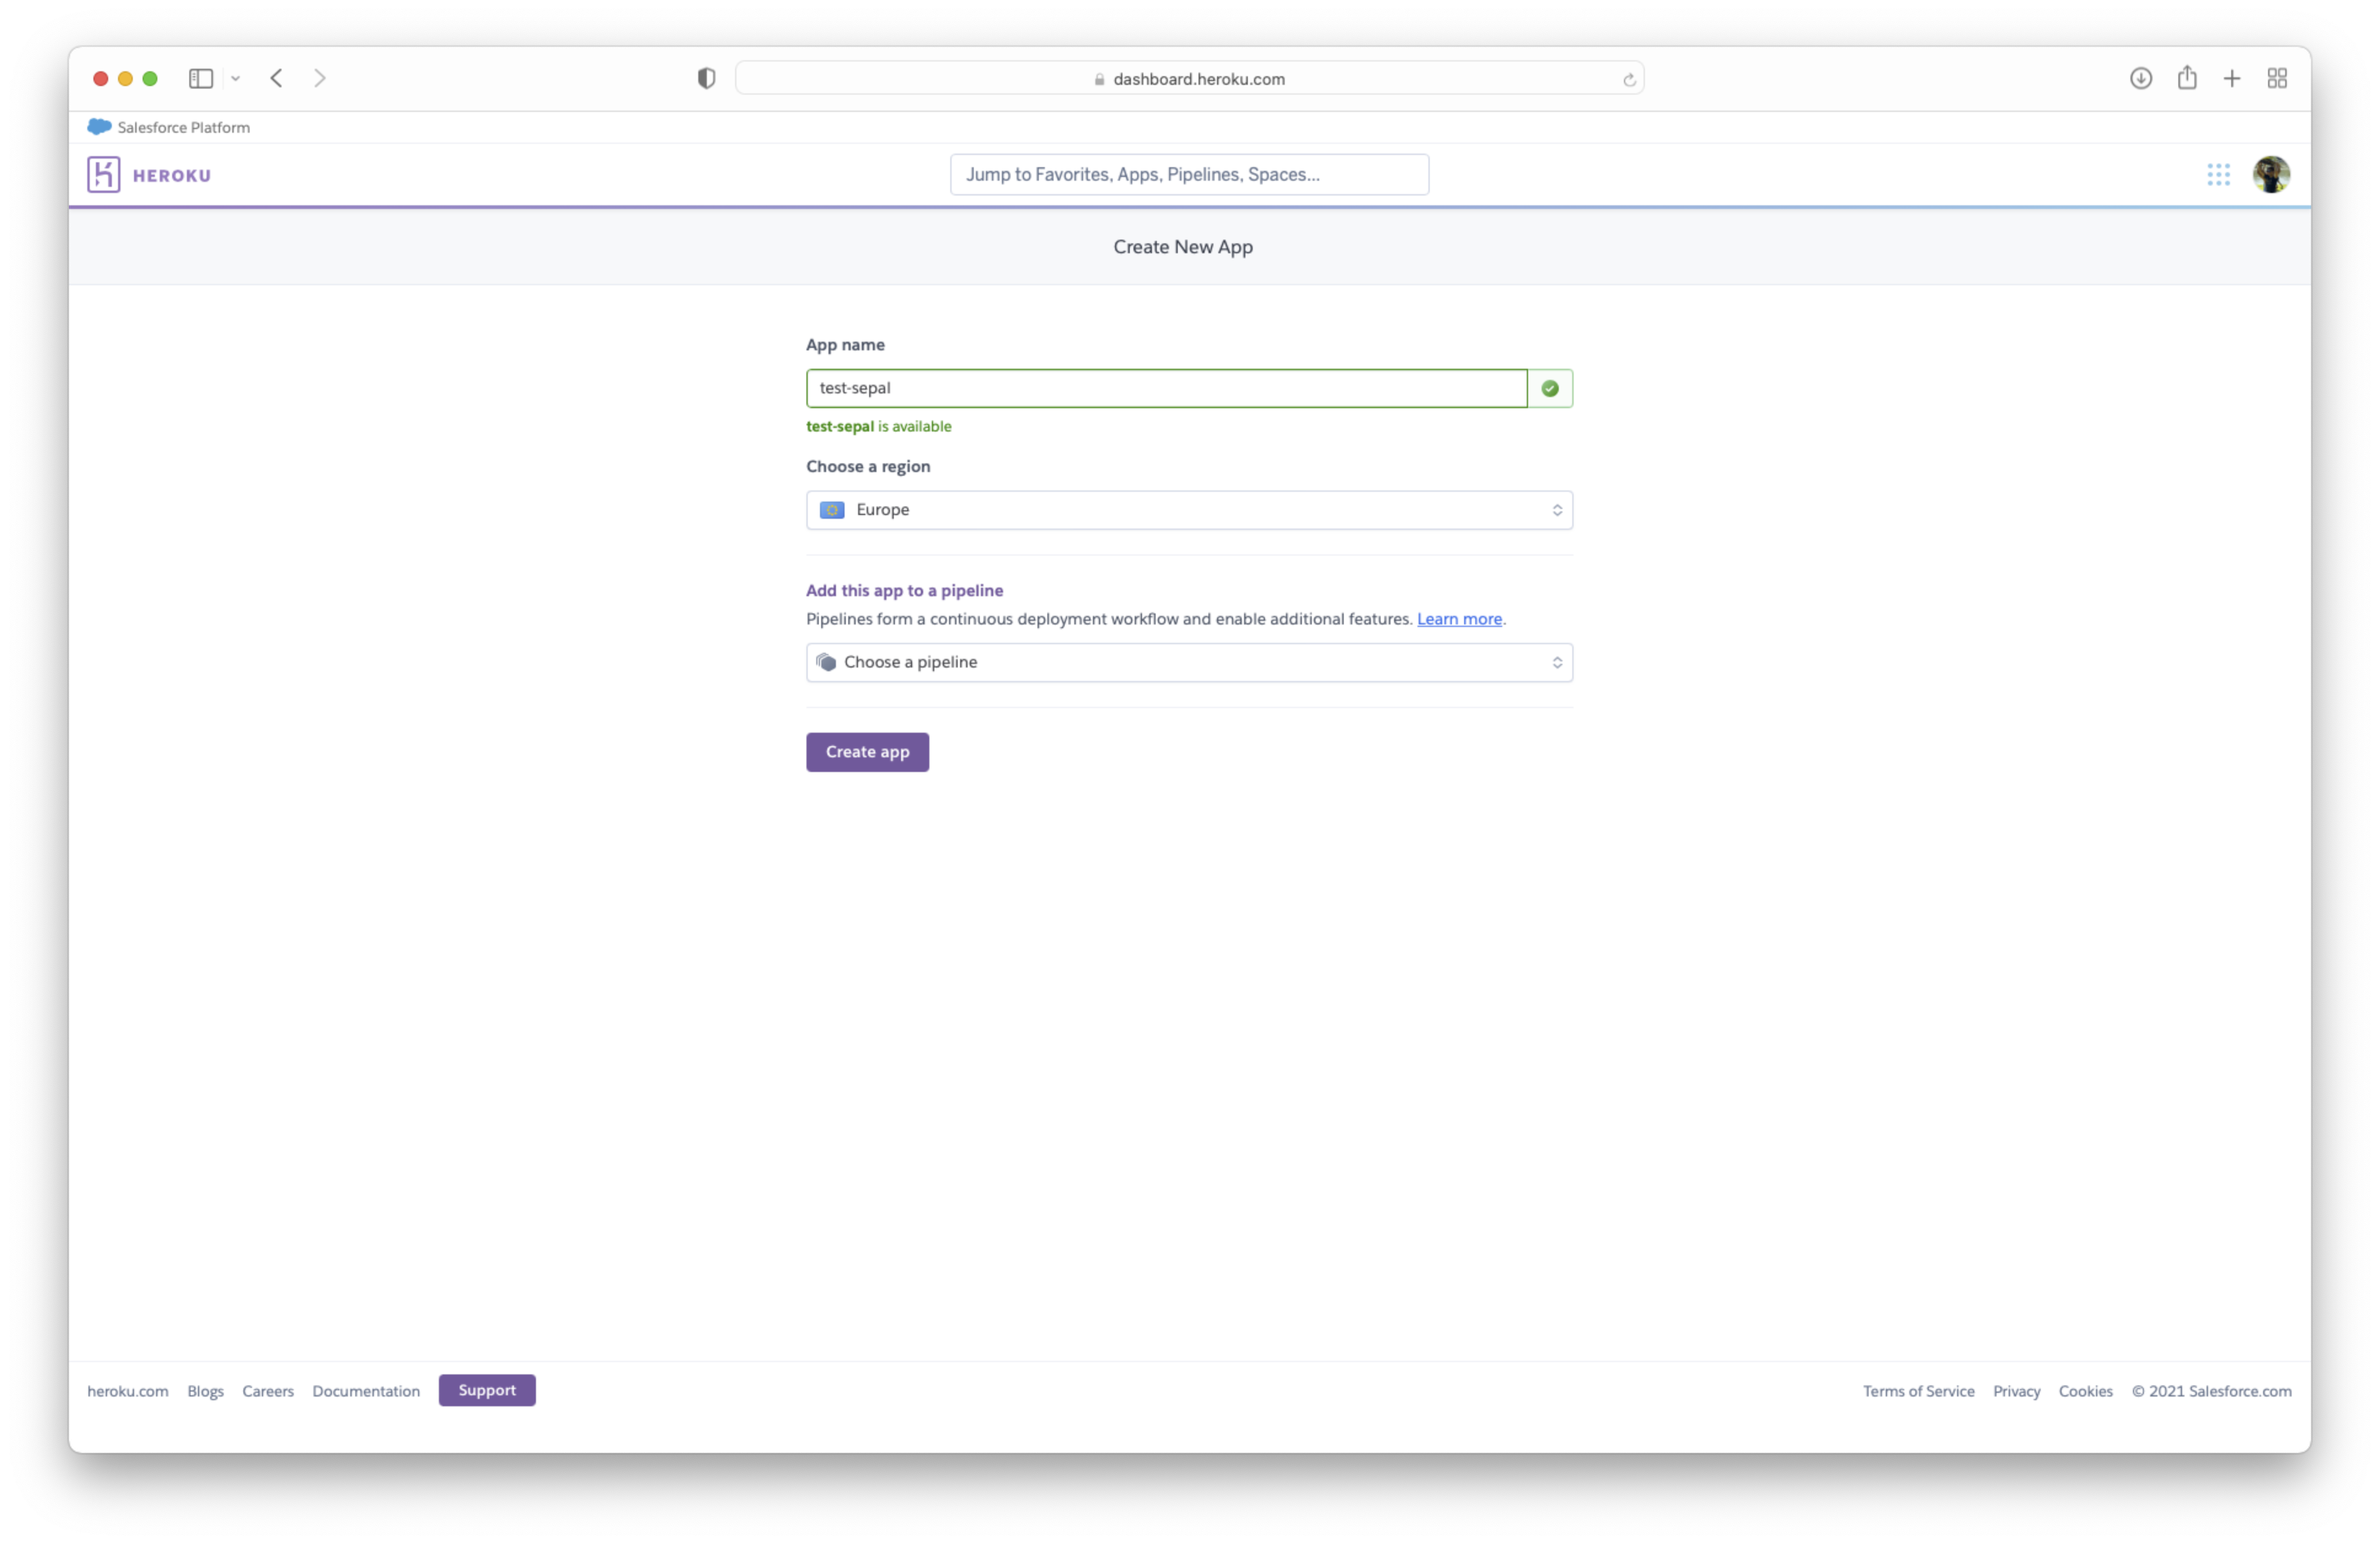
From your Heroku dashboard click on new -> Create new app and follow the initial instructions (app-name and region). You can then click on create app.
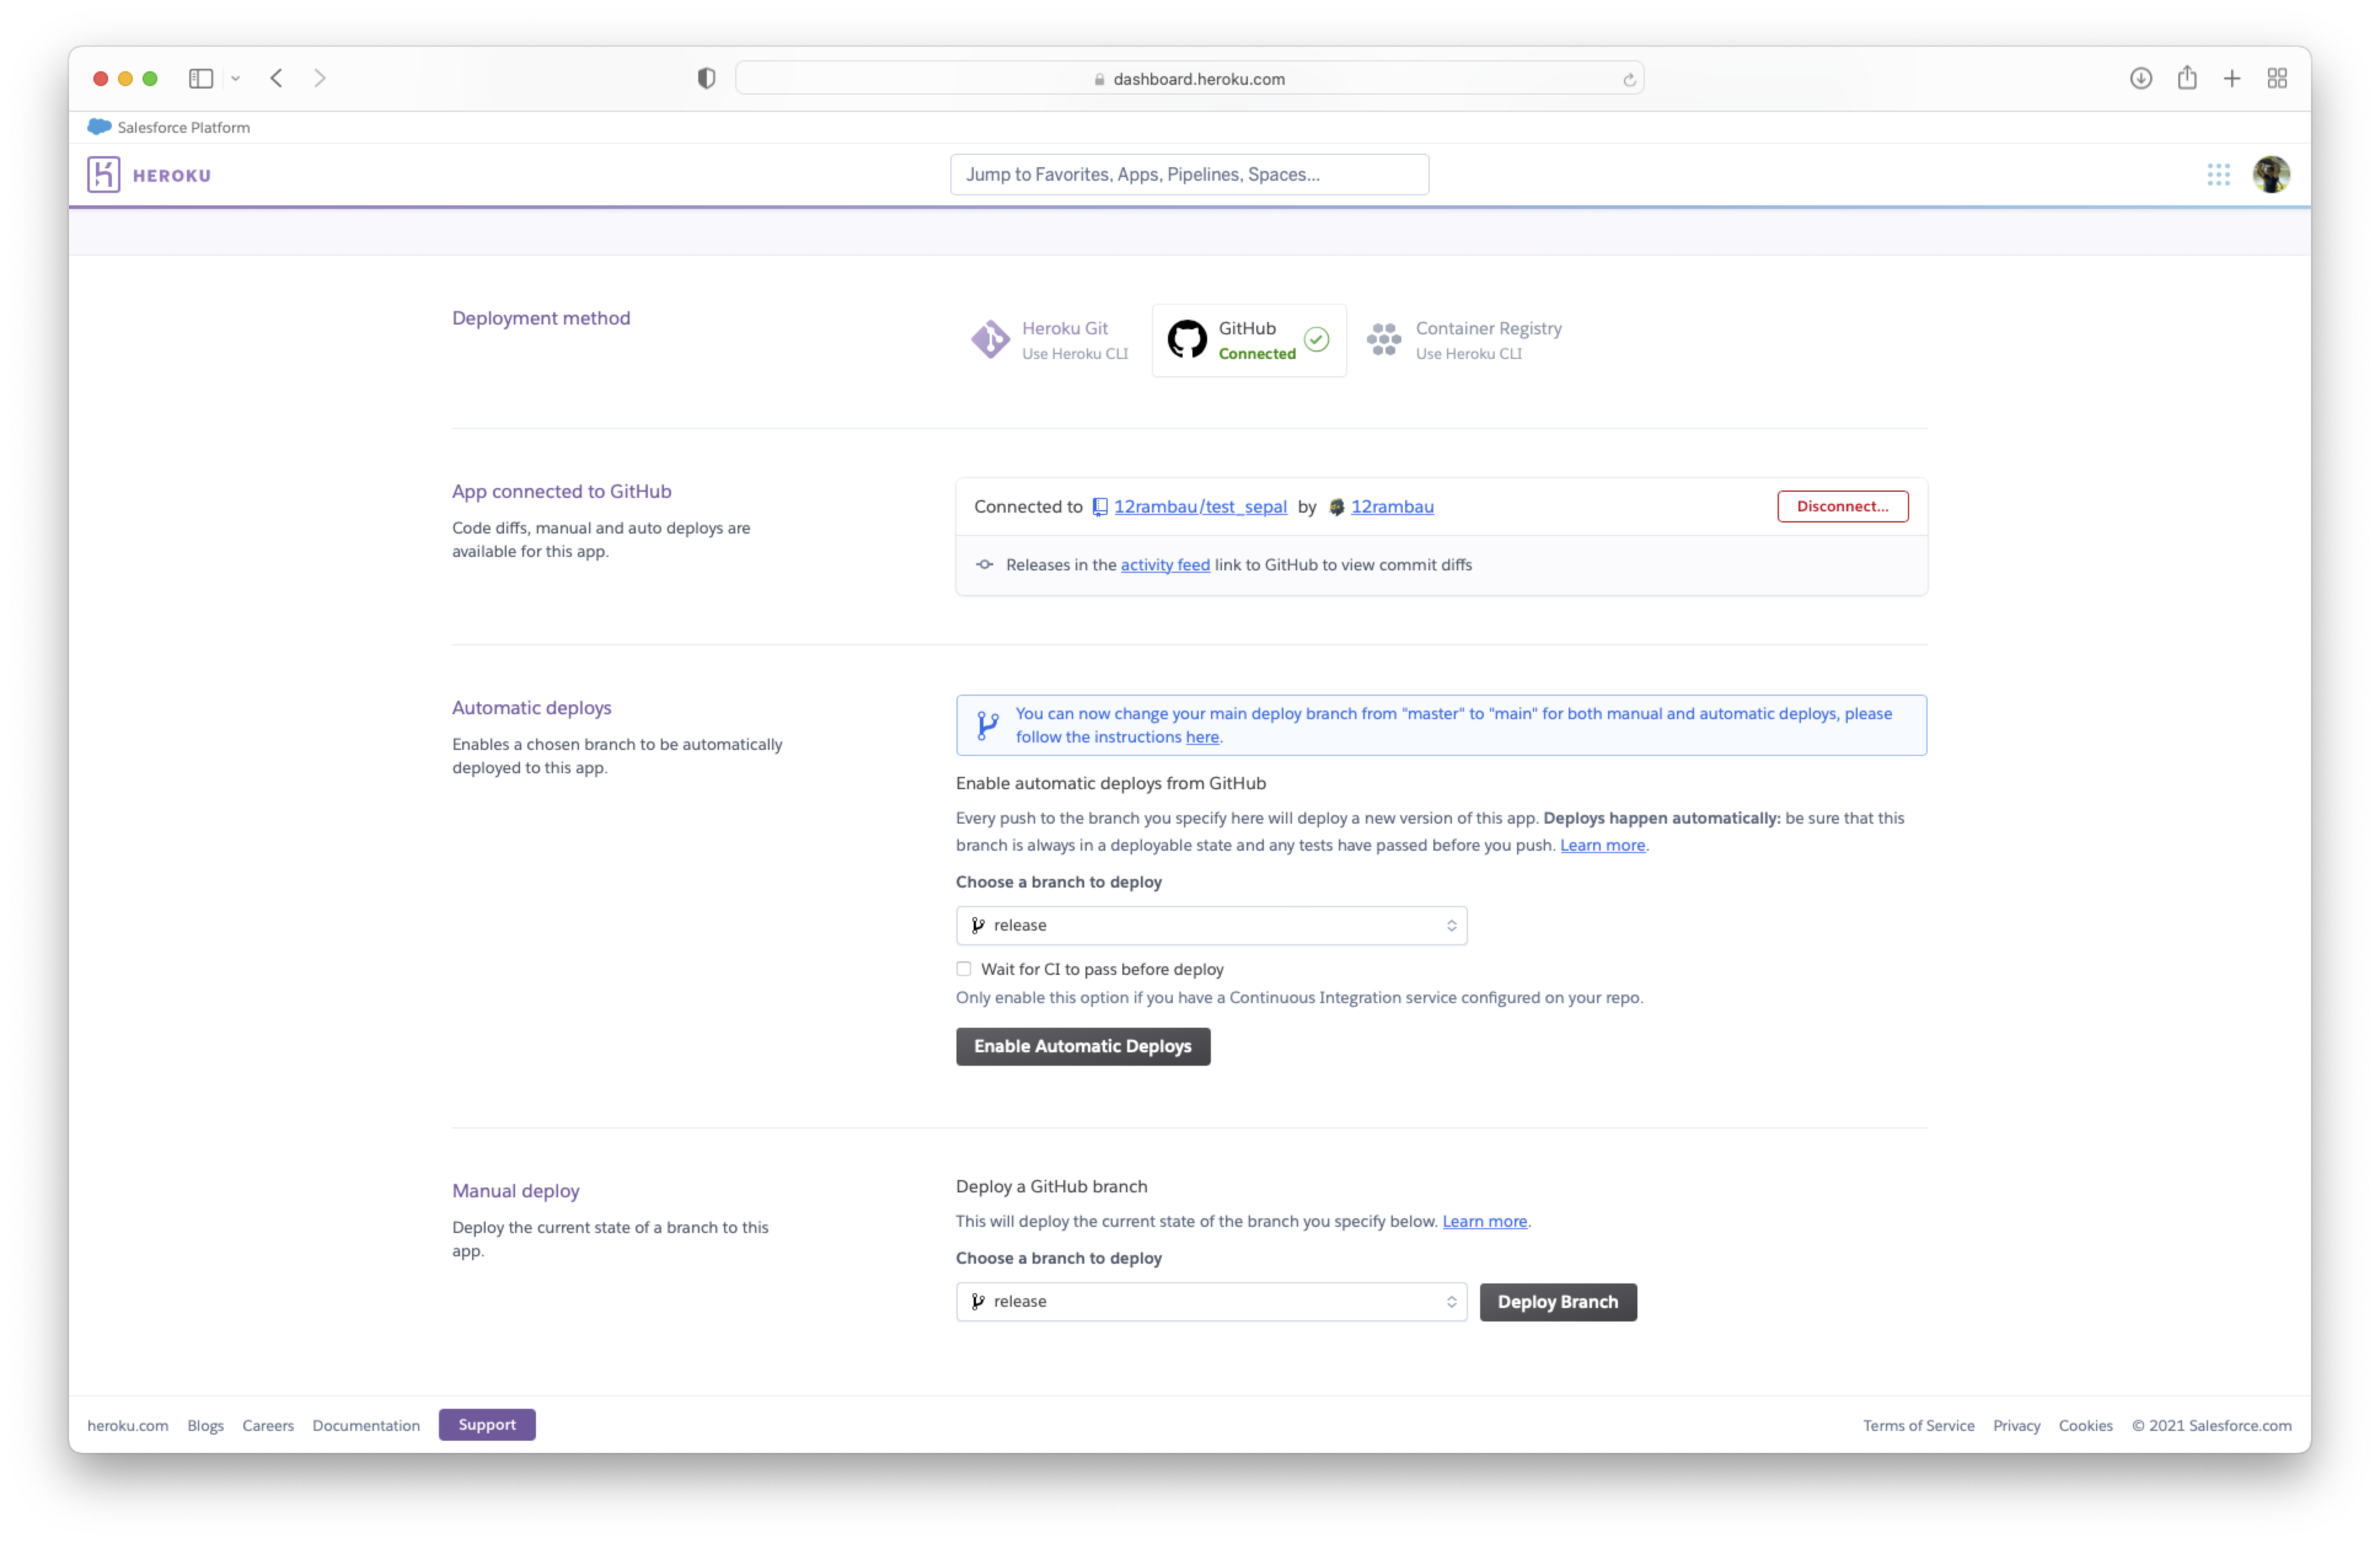
Then fill the following parameters in the user interface:
deployment method: Use the github method
App connected to github: Find your repository name in the provided list clicking on search.
choose automatic or manual deploy. In both cases, we highly suggest using the
releasebranch.
Warning
Do not build it yet, it’s going to crash.
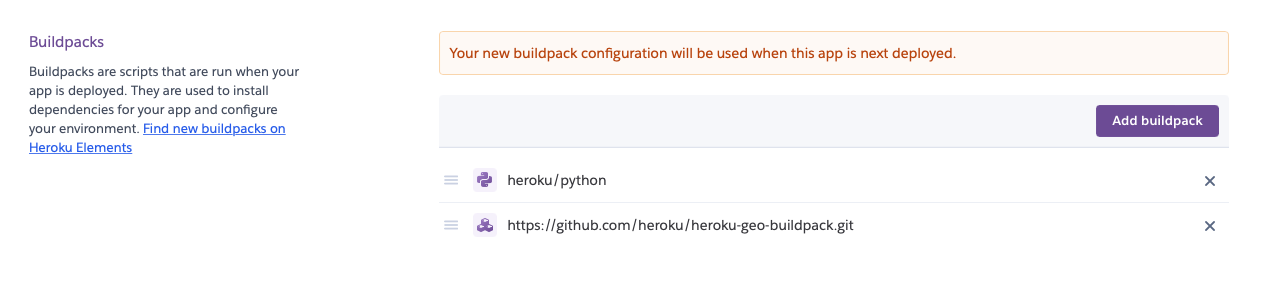
Now we need to set up the GIS environment of the app. Go to settings and then add buildpack.
There are 2 required buildpack to use for this app. First the official Python buildpack (simply click on Python) and the GDAL/PROJ buildpack using this link: heroku/heroku-geo-buildpack.git.
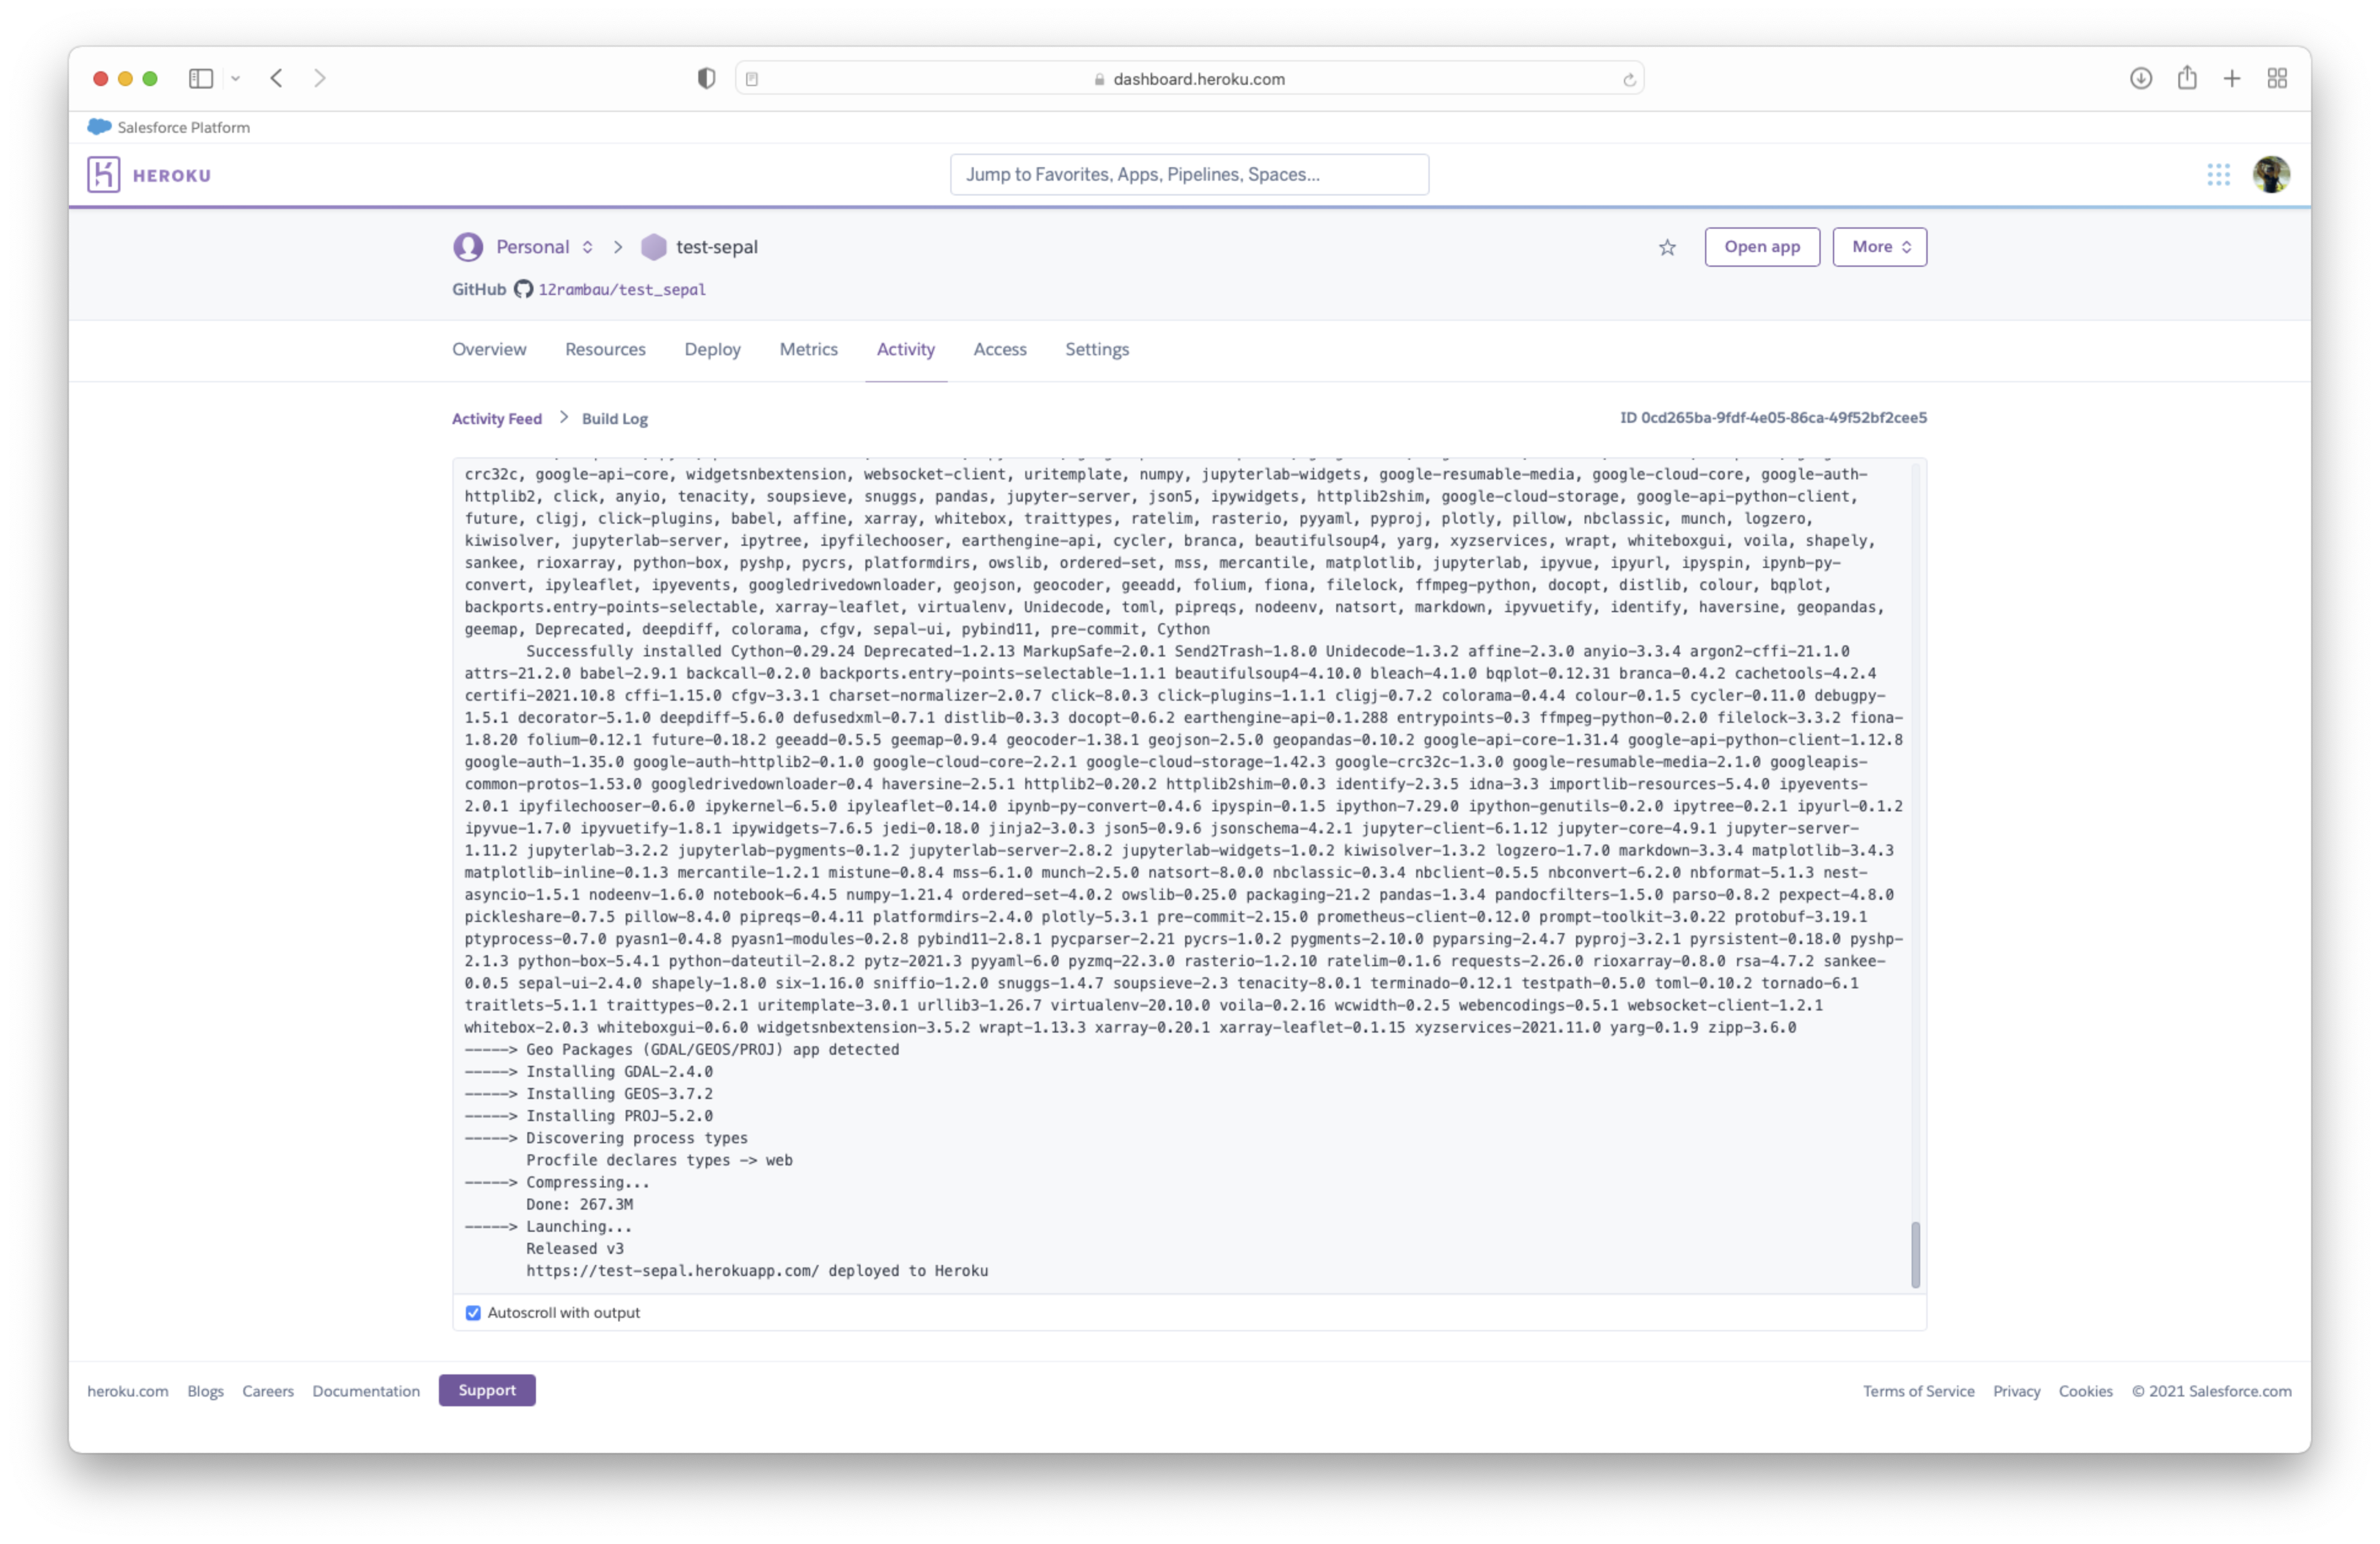
Now you are ready to build your app, click on deploy at the bottom of the “deploy” tab.
At the very bottom of your build log, you’ll find the web URL that renders your app.
Important
Congratulation you’ve built your first pysepal based app on Heroku!