Creating PySepal apps with Solara#
This tutorial guides you through creating PySepal web applications using the Solara framework. You’ll learn how to build interactive geospatial applications that integrate with Google Earth Engine, SEPAL’s file system, and how to deploy them in containers.
Overview#
Solara is a reactive web framework for Python that enables you to build web applications using familiar Python components. When combined with SEPAL UI, it provides a powerful platform for creating geospatial applications with:
Seamless Google Earth Engine integration (multi-user support)
Access to SEPAL user files and storage
Interactive mapping capabilities
Containerized deployment
Prerequisites#
Before starting, ensure you have:
Python 3.10 or later
Access to a SEPAL account and connection to Google Earth Engine
Basic knowledge of Python and web development concepts
Familiarity with Google Earth Engine
Development Environment Setup#
We strongly recommend developing PySepal applications on a Linux system for the best compatibility and performance. The following setup will ensure you have all the necessary tools and dependencies.
Setting Up Conda Environment#
First, create and activate a conda environment for your development:
# Create a new conda environment with Python 3.10
conda create -n pysepal_dev python=3.10 pip jupyter -y

# Activate the environment
conda activate pysepal_dev
Cloning and Installing SEPAL UI#
Instead of installing directly from GitHub, we recommend cloning the repository first and installing in development mode. This allows you to explore the examples, modify the code, or contribute back:
# Clone the pysepal repository (solara3 branch)
git clone -b solara3 https://github.com/openforis/pysepal.git
cd pysepal

# Install in development mode (editable installation)
pip install -e .
This development installation approach:
Installs all necessary dependencies including Solara, ee-client, and SEPAL UI components
Allows you to modify the library code and see changes immediately
Provides access to examples, notebooks, and templates
Enables you to contribute improvements back to the project
📚 Understanding Architecture#
Building PySepal applications starts with internalizing that every line of your code executes in a shared, long‑lived server process that is simultaneously serving many users. There is no private desktop sandbox: multiple browser sessions will trigger the same Python module state, and any global singleton you create could accidentally leak context from one user to another.
To create PySepal applications, it’s crucial to understand key concepts that enable multi-user, server-deployed applications. Applications deployed on the Solara server need to handle multiple users simultaneously, each with their own authentication and data access context.
Multi-User Challenges#
File System Access#
When building PySepal applications, you cannot use standard Python file operations like os.listdir() or pathlib. If you did, your application would navigate the server’s filesystem instead of the user’s personal workspace.
The SepalClient solves this by authenticating with SEPAL’s user-files API module. It makes HTTP requests to SEPAL’s backend, which performs file operations within each user’s isolated workspace. The API is familiar: files.list() to browse, files.read_bytes() to download, files.write() to upload, and files.mkdir() to create directories. Each operation is authenticated with the user’s SEPAL session ID, automatically handling path sanitization, MIME type detection, and creating a dedicated results directory for your module.
To see the SepalClient in action, check the SEPAL Client notebook below.
Google Earth Engine Integration#
Multi-User Authentication#
One of the main limitations of the standard Earth Engine API is its global authentication model. When a user calls ee.Initialize(), all Python contexts on that server share the same authentication. In a multi-user environment, this means all users would share a single authentication per server.
To solve this, we use the ee-client package, which allows us to create individual Earth Engine clients per user. The ee-client makes POST requests directly to Google Earth Engine and returns results specific to each user’s authentication context.
GEEInterface Wrapper#
To bridge the gap between traditional Earth Engine development (single-user) and multi-user SEPAL applications, we created the GEEInterface wrapper. This wrapper provides a unified API that seamlessly handles both single-user and multi-user deployments, using ee-client internally for multi-user scenarios.
The advantage of GEEInterface lies in its dual-mode architecture. When developing locally, initialize it without any session parameter—it uses the standard ee module after ee.Initialize(). When deployed to SEPAL with multiple users, pass an EESession to switch to the async ee-client flow, ensuring each user gets isolated credentials. In pysepal Solara apps this is the default: SessionManager builds EESession(sepal_headers=...) and exposes a session-backed GEEInterface through get_current_gee_interface().
The interface maintains its own event loop thread to support blocking bridge methods such as get_info() or get_map_id(). In SessionManager-backed Solara code, prefer the *_async variants directly and keep those coroutines on Solara’s current loop, typically via solara.lab.use_task(..., prefer_threaded=False). Do not introduce a separate async getter for new Solara code.
Common Operations#
The GEEInterface supports all the essential Earth Engine operations you need for geospatial applications:
Value compute: Use
get_info()orget_info_async()to compute Earth Engine objects, whether they’re images, feature collections, or geometries.Map visualization: Call
get_map_id()to obtain map tile descriptors that you can use to display Earth Engine imagery in maps.Export operations: Launch exports of images or tables to Earth Engine assets or Google Drive, with full control over format, region, scale, and other parameters.
Task management: Check whether a task is running with
is_running(), retrieve task details withget_task(), and monitor long-running operations.Progress tracking: In new Solara apps, prefer
solara.lab.use_task(..., prefer_threaded=False)with the*_asyncmethods.create_task()remains available for legacy bridge flows.
Asynchronous vs Blocking Methods#
Choose the right variant: In SessionManager-backed Solara apps, use async methods (
*_async) by default. Reserve blocking methods for simpler legacy or non-Solara code paths.One interface per session: In multi-user apps, always create one
GEEInterfaceper user session, you can use the session_manager helpers to do this automatically.Solara event-loop rule: If you wrap GEE work in
solara.lab.use_task, setprefer_threaded=Falseso the coroutine stays on Solara’s current loop instead of hopping to a per-task thread loop.Watch for deadlock warnings: If you get a deadlock warning, you’re calling a blocking method from the interface’s async thread—switch to the
*_asyncmethod.
To explore GEEInterface capabilities, check the GEE Interface notebook below.
DriveInterface#
The DriveInterface works similarly but uses SEPAL’s authentication for Google Drive access. Since there’s no separate drive-client, all requests are made synchronously, but each user gets their own authenticated Drive interface using their individual SEPAL credentials.
To explore DriveInterface capabilities, check the Drive Interface notebook below.
SessionManager: Multi-User Context Handler#
The SessionManager is a singleton class that stores sessions per user and is fundamental to the multi-user architecture. This component must be initialized in all Solara applications (as shown in the examples below) to properly set up the other services:
Creates and manages individual sessions for each user
Stores GEEInterface, SepalClient, and DriveInterface instances per user session
Ensures proper isolation between users
Handles session cleanup and lifecycle management
In the application examples below, you’ll see how to initialize the SessionManager using the setup_sessions() function within the @solara.lab.on_kernel_start decorator.
Hands-On Learning#
Before building your own application, explore the provided notebooks and templates.
Example Notebooks
Start Jupyter Lab and run these notebooks from pysepal/notebooks:
cd pysepal/notebooks
jupyter lab
Learn how to access user files stored in SEPAL’s file system
Understand authentication with SEPAL services
See examples of file upload, download, and workspace management
Essential for applications that need to read/write user data
GEE Interface (02_gee_interface.ipynb)
Understand Google Earth Engine integration with proper session management
Learn about synchronous and asynchronous Earth Engine operations
See how to handle serialized Earth Engine objects
Critical for any geospatial data processing applications
Drive Interface (03_drive_interface.ipynb)
Explore Google Drive integration for file management
Understand how to list, download, and manage files from Google Drive
Important for applications that need cloud storage integration
Important
Run these notebooks and experiment with the code before proceeding to build your own applications. The concepts demonstrated in these notebooks form the foundation of all PySepal applications.
Testing Solara Templates#
Create a .env file in the pysepal root directory:
# Development settings
SOLARA_TEST=true
LOCAL_SEPAL_USER=your_username
LOCAL_SEPAL_PASSWORD=your_password
SEPAL_HOST=sepal.io # or your custom SEPAL instance URL
The repository also includes ready-to-run Solara application templates:
# Activate conda environment
conda activate pysepal_dev
# Navigate back to the main pysepal directory
cd /path/to/pysepal
# Make the run script executable
chmod +x run_solara.sh
# Test the basic file input example
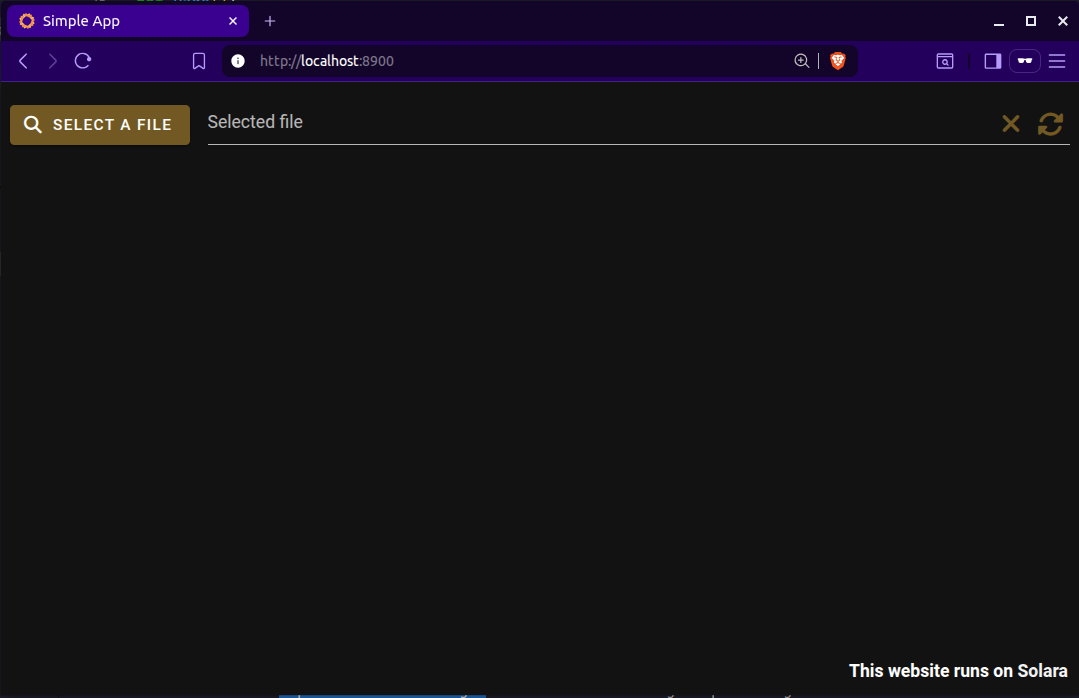
./run_solara.sh pysepal/templates/solara/solara_map_app/simple_app.py --port 8900
# Test the map application template
./run_solara.sh pysepal/templates/solara/solara_map_app/app.py --port 8901
The run_solara.sh script automatically:
Loads environment variables from your
.envfileSets up proper SEPAL authentication variables
Configures Solara server settings
Launches your application with the correct port configuration
Note
Never commit your .env file with real credentials to version control. Use environment-specific configurations and secure credential management in production.
🚀 Building PySepal Applications#
Now that you understand the core concepts and have tested the examples, let’s build your own applications.
Basic Application Structure#
Here’s the basic structure for a Solara-based SEPAL application:
# this code can be found at: pysepal/templates/solara/solara_map_app/simple_app.py

from pathlib import Path
import solara

from pysepal.sepalwidgets.file_input import FileInput
from pysepal.solara import (
    setup_sessions,
    with_sepal_sessions,
    get_current_gee_interface,
    get_current_sepal_client,
    setup_theme_colors,
    setup_solara_server,
)

# Initializes the Solara server with optional asset locations (can be .css or .js files)
setup_solara_server(extra_asset_locations=[])

# Sets up session management when the application starts
@solara.lab.on_kernel_start
def on_kernel_start():
    """Set up sessions management for Solara applications."""
    return setup_sessions()

@solara.component
# Decorator that provides SEPAL session context to the app
@with_sepal_sessions(module_name="your_module_name")
def Page():

    # Set up SEPAL theme colors
    setup_theme_colors()

    # Get SEPAL interfaces (they can be obtained from anywhere in your app)
    gee_interface = get_current_gee_interface()
    sepal_client = get_current_sepal_client()

    # Your application content here
    solara.Markdown("# Welcome to Your SEPAL Application")

    # Add your components
    FileInput.element(sepal_client=sepal_client)
To run the application, use the provided run_solara.sh script as shown in the previous section, providing the path to your application file. If everything is set up correctly, your application should launch in the browser and the file system should show the files from your SEPAL workspace.
Map-Based Applications#
For map based applications, SEPAL UI provides the MapApp component that creates a map-based interface.
Complete Map Application Example#
# this code can be found at: pysepal/templates/solara/solara_map_app/app.py

import logging
import ipyvuetify as v
import solara
import ee

from pysepal.mapping import SepalMap
from pysepal.sepalwidgets.vue_app import MapApp
from pysepal.solara import (
    get_current_drive_interface,
    get_current_gee_interface,
    get_current_theme_state,
    get_current_sepal_client,
    setup_sessions,
    setup_solara_server,
    setup_theme_colors,
    with_sepal_sessions,
)
from pysepal.solara.components.admin import AdminButton
import pysepal.sepalwidgets as sw

setup_solara_server()

@solara.lab.on_kernel_start
def on_kernel_start():
    return setup_sessions()

@solara.component
@with_sepal_sessions(module_name="your_map_module")
def Page():
    setup_theme_colors()

    # Get SEPAL interfaces
    gee_interface = get_current_gee_interface()
    sepal_client = get_current_sepal_client()
    theme_state = get_current_theme_state()

    # Create the main map
    map_ = SepalMap(gee_interface=gee_interface, fullscreen=True, theme_state=theme_state)
    map_.center = [4.75, -74.12]  # Set initial center

    # Create UI components for map interactions
    aoi_selector = v.Card(
        children=[
            v.CardTitle(children=["Area of Interest Selection"]),
            v.CardText(children=["Select your area of interest on the map."]),
            v.Btn(children=["Select AOI"], color="primary"),
        ]
    )

    # Define steps for the sidebar
    steps_data = [
        {
            "id": 1,
            "name": "AOI Selection",
            "icon": "mdi-map-marker-check",
            "display": "step",
            "content": aoi_selector,
        },
        {
            "id": 2,
            "name": "Processing Settings",
            "icon": "mdi-cog",
            "display": "step",
            "content": v.Card(children=[v.CardText(children=["Processing options here"])]),
        },
    ]

    # Configuration for the right panel
    right_panel_config = {
        "title": "Results",
        "icon": "mdi-image-filter-hdr",
        "width": 400,
        "description": "View and export your results.",
        "toggle_icon": "mdi-chart-line",
    }

    # Right panel content with controls
    right_panel_content = [
        {
            "title": "Layer Controls",
            "icon": "mdi-layers",
            "content": [
                sw.TaskButton("Add Layer", small=True, block=True),
                sw.Btn("Remove All", small=True, block=True),
            ],
        },
    ]

    # Create the complete map application
    MapApp.element(
        app_title="Your Map Application",
        app_icon="mdi-map",
        main_map=[map_],
        steps_data=steps_data,
        right_panel_config=right_panel_config,
        right_panel_content=right_panel_content,
        right_panel_open=True,
        theme_state=theme_state,
        dialog_width=750,
    )
If everything is set up correctly, your map application should launch successfully. Here’s what it looks like in both themes:
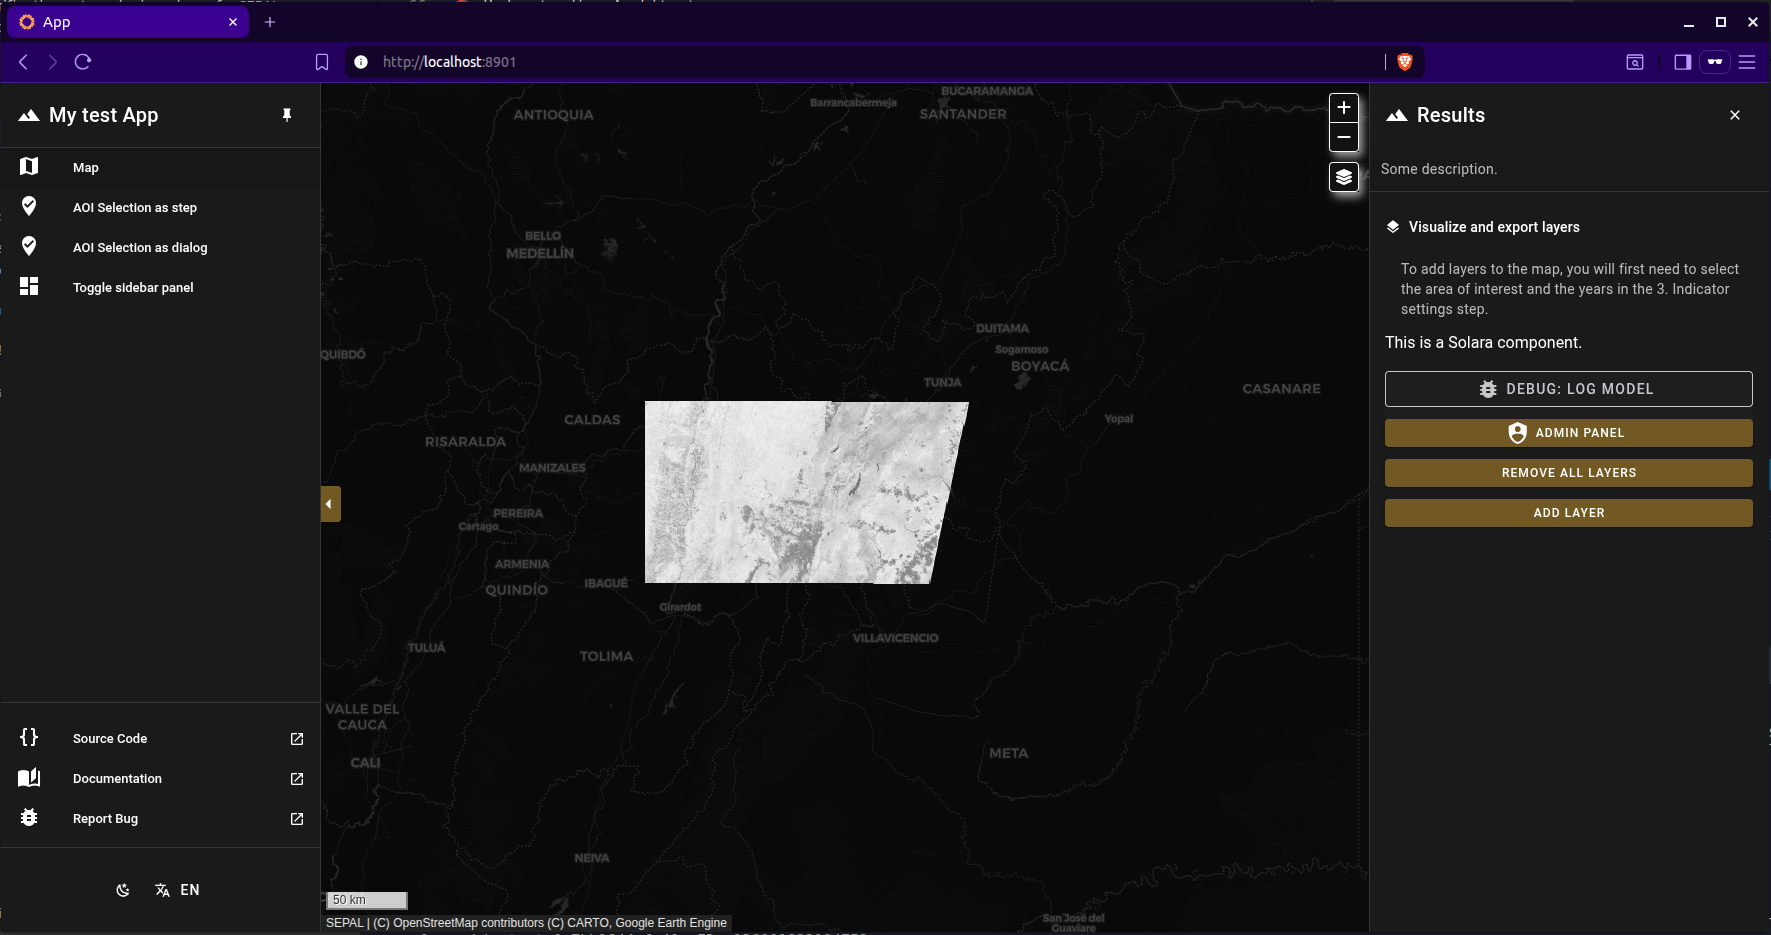
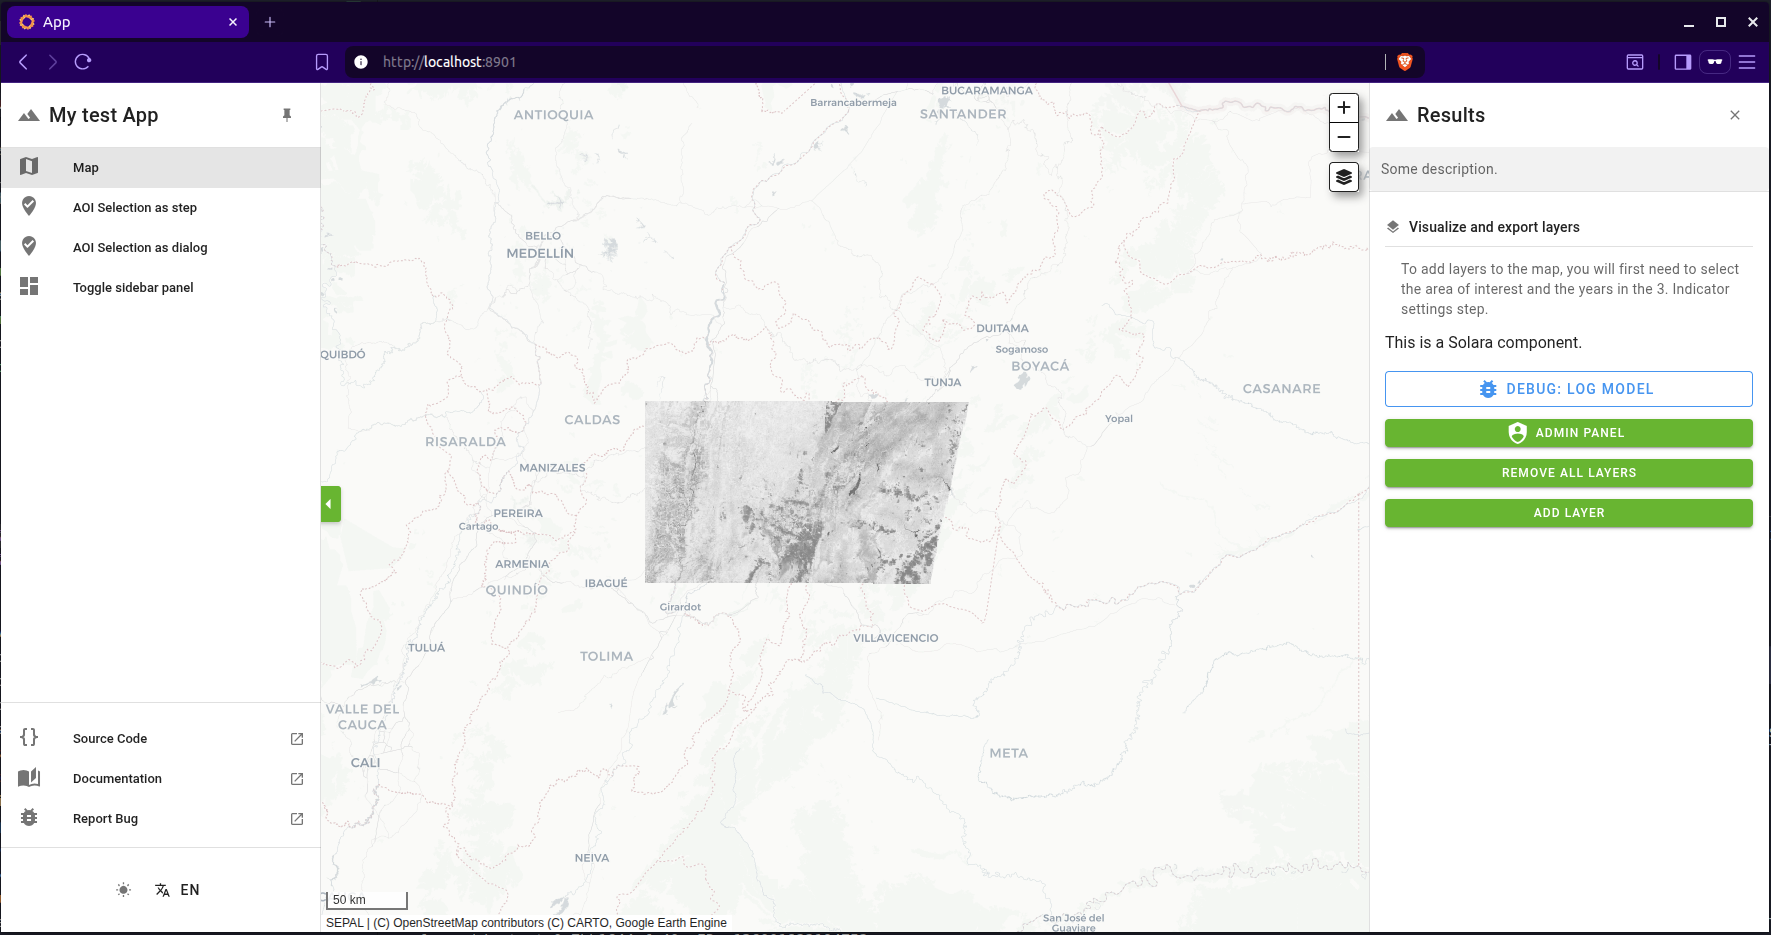
MapApp Component Features#
The MapApp component provides:
Step-based Workflow: Organize your UI into logical steps
Dialog Support: Pop-up dialogs for detailed interactions
Right Panel: Collapsible panel for results and controls
Theme Integration: Automatic theme switching support
Containerization and Deployment#
SEPAL applications are deployed using Docker containers. Here’s the complete deployment setup.
Docker Configuration#
Dockerfile:
FROM mambaorg/micromamba:latest

LABEL org.opencontainers.image.source="https://github.com/sepal-contrib/your-app"

WORKDIR /usr/local/lib/your_app

USER root
RUN apt-get update && apt-get install -y \
    nano curl neovim supervisor netcat-openbsd net-tools git \
    && apt-get clean \
    && rm -rf /var/lib/apt/lists/* \
    && rm -rf /tmp/* \
    && rm -rf /var/tmp/*

COPY supervisord.conf /etc/supervisor/conf.d/supervisord.conf

USER $MAMBA_USER

COPY requirements.txt /home/$MAMBA_USER/requirements.txt
RUN micromamba create -n your_app python=3.10 pip -c conda-forge -y && \
    micromamba activate your_app && \
    pip install -r /home/$MAMBA_USER/requirements.txt

COPY . /usr/local/lib/your_app

USER root
RUN chown -R $MAMBA_USER:$MAMBA_USER /usr/local/lib/your_app

USER $MAMBA_USER

EXPOSE 8765

CMD ["/usr/bin/supervisord", "-c", "/etc/supervisor/conf.d/supervisord.conf"]
docker-compose.yml:
services:
  your_app:
    build:
      dockerfile: ./Dockerfile
      args:
        - GIT_COMMIT=${GIT_COMMIT:-""}
    image: "your-org/your_app"
    container_name: your_app
    volumes:
      - "${EE_CREDENTIALS_PATH:-${HOME}/.config/earthengine/credentials}:/root/.config/earthengine/credentials"
    environment:
      SEPAL_HOST: "${SEPAL_HOST}"
      FORWARDED_ALLOW_IPS: "*"
      SOLARA_THEME_SHOW_BANNER: "False"
      SOLARA_TEST: "${SOLARA_TEST:-false}"
      LOCAL_SEPAL_USER: "${LOCAL_SEPAL_USER:-}"
      LOCAL_SEPAL_PASSWORD: "${LOCAL_SEPAL_PASSWORD:-}"
    healthcheck:
      test: ["CMD", "nc", "-z", "localhost", "8765"]
      timeout: 60s
      interval: 1s
      retries: 60
    networks:
      - sepal
    restart: always
    labels:
      org.opencontainers.image.source: https://github.com/your-org/your_app

networks:
  sepal:
    external: true
Key Configuration Notes:
Port 8765: Standard port for Solara applications in SEPAL. Ports must be unique per application and should be consecutive (8765, 8766, 8767, etc.)
Health Check: Ensures the container is running properly
Environment Variables: Configure SEPAL host and authentication
Network: Uses external SEPAL network for communication
Application Registration#
Once your application is containerized, register it in SEPAL’s application file apps.json.
Registering Your App in SEPAL#
Add an entry to the apps.json file:
{
  "id": "your_app_id",
  "label": "Your Application Name",
  "path": "/api/app-launcher/your_app_id",
  "endpoint": "docker",
  "tags": ["ANALYSIS", "MAPPING"],
  "pinned": false,
  "googleAccountRequired": true,
  "logoRef": "sepal.png",
  "author": "Your Name/Organization",
  "description": "Detailed description of what your application does",
  "tagline": "Short tagline describing your app",
  "projectLink": "https://github.com/your-org/your-app",
  "repository": "https://github.com/your-org/your-app",
  "port": 8765,
  "branch": "main"
}
Conclusion#
This tutorial covered the complete workflow for creating PySepal applications with Solara, from basic authentication to full deployment. The combination of SEPAL UI components, Solara’s reactive framework, and proper containerization provides a powerful platform for building professional geospatial applications.
Key takeaways:
Use SEPAL’s session management system for authentication
Leverage pre-built components for common functionality
Structure your application with the MapApp component for map-based interfaces
Use Docker for deployment
Register your application properly in SEPAL’s catalog
For more information and examples, refer to the SEPAL UI documentation and the example applications in the templates directory.
Happy coding!